I had a little wax that came from the three supers that I extracted. It was rather grungy looking (wish I had taken a picture of it. It went through my mentors capping tank and then through his wax/honey separator. I searched the internet and found some really nice wax melters but I wanted something quick and cheap. :-D
The tools and equipment that I used:
1. A weak mind.
2. Styrofoam cooler big enough to put my containers in with some wiggle room.
3. Pack of (3) Glad family microwaveable containers. I only used two.
4. Wooden skewers or cord (nylon or cotton, I don't think it will matter).
5. Black paint
6. Oven roasting turkey bag.
7. Aluminum foil.
8. Duck tape.
9. Nail
10. Vise-Grip pliers to hold nail.
11. Propane torch to heat nail.
12. Paper Towels
13. Wire clothes hanger.
14. Cookie tin...or something else metal and that can raise the wax containers up 2-3 inches.
15. Flat metal to put around the sides...I used a couple of old license plates.
It's really simple. I bought a $6 cooler at the dollar store.
I used a sharp knife to cut the center out of the top. I used the lip that runs around the inside surface of the lid and seals the lid to the cooler as my guide. This resulted in the center cut out piece and a "window frame".
I then slipped the styrofoam "window frame" into an turkey roasting bag and sealed it with the twist tie. Be careful here as the styrofoam frame is weak and fragile. The center portion that was cut out was then covered with aluminum foil...this would end up being the reflector. These two piece were then set to the side for the time being.
Next was the cooler itself. The inside was lined with aluminum foil. A piece of foil was first laid in the bottom of the cooler, pressing it in for a good fit. I then ran the foil along the sides of the cooler, pressing it into a corner before continuing on around to insure a good fit. The top edge of the foil was folded over the cooler top edge and taped it down. This was actually a solid piece of foil ran around the inside and taped it down at one spot.
I used the duck tape to make a "hinge" for the window to tilt on.
The coat hanger was used as a prop for the reflector. This is a trial and error type of thing. The cooler isn't that substantial and piercing the cooler with the coat hanger didn't seem attractive. I ended up bending some "U" spots into the hanger. The "U" could be pressed down on the top edge of the reflector and the other end of the hanger wire could be attached to something solid to hold it in place. In my application I was sitting the melter in a lawn chair so I used the back of the chair for the solid support.
I took the cookie tin and the tags and painted them flat black. Being in the bottom of the cooler I wanted them absorbing all the radiant energy they could. Up higher I wanted the energy to bounce around hitting the wax. It all adds up to a big meltdown. ;) If this was a permanent, more substantial solar wax melter I would line the bottom with regular bricks painted black...this would make a good heat sink to help out when clouds moved in front of the sun for a few minutes. But, being this is a light duty melter I'll let the thin metal suffice. :)
The propane torch was used to heat a nail (held by the vise-grips). The hot nail was used to make holes in the bottom of one of the plastic Glad containers. Be sure and keep the holes in the bottoms and don't stray up the sides. Put LOTS of them in the bottom. A paper towel "filter" is placed in the bottom of this modified container.
The filtered wax container only needs four holes made in it. You can do this with a sharp nail by twisting it back and forth...mine came out fine doing it like this (actually cleaner than the hot nail). The nail holes need to be just under the edge of the lip of the container...not hidden under the lip, but immediately below the lip. There needs to be two holes on two opposing sides, these are to slide the skewers into.
When I first rigged the filtered wax container I put two holes in each side and laced a nylon cord through in a "tic-tac-toe" design...that worked great to hold the container with the holes and wax in it but the cord had to be unlaced to remove the cooled wax...thus I changed to the skewers. After thinking about it I'm going to try the skewers on a trial run and see if I have a problem with wax running out the holes they fit through. If there's a problem with leaking there I'm going to change to only two strands of nylon cord.
Anyhow, so much for my confusing dialogue...here's some pictures. ;)
Ed
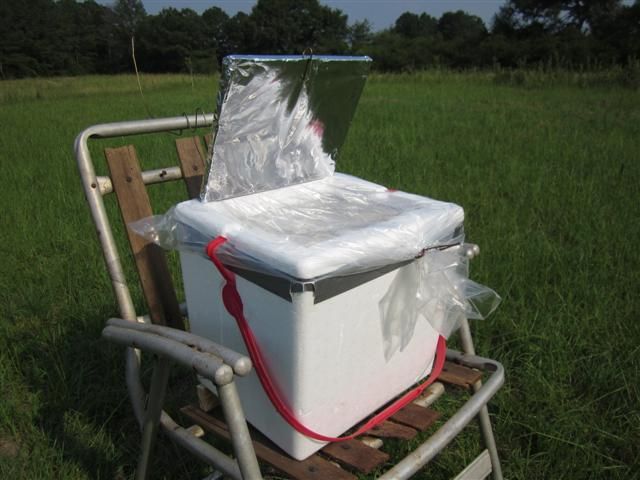
Overall shot of the solar wax melter with some comb wax in it. If you look closely you can see the coat-hanger I'm using to prop the reflector up with. I've also got the rear of the melter propped up a touch...
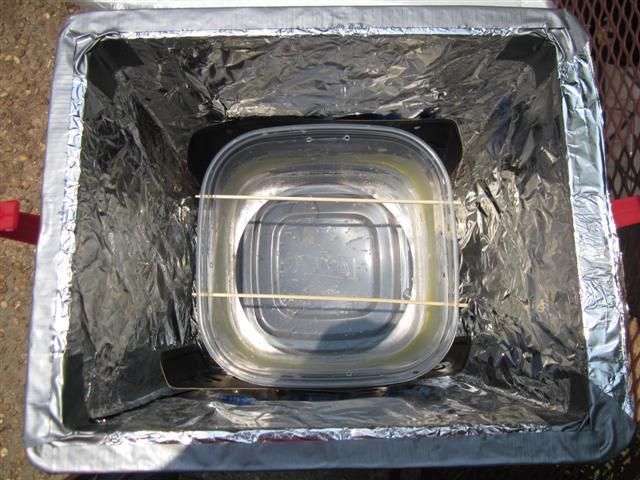
This one shows the bottom (filtered wax container) placed inside the cooler. The skewers are installed...
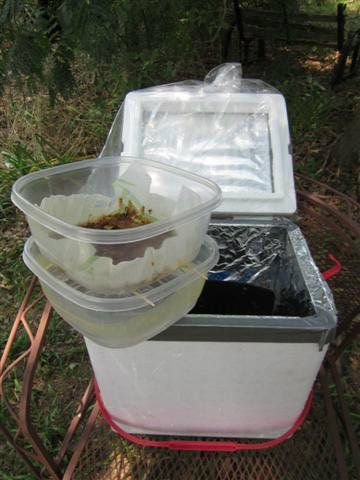
A shot of the top (wax to be melted) container installed. This is some residue in the top container from melting some honeycomb. I'll save the trash and paper towel to use to light my smoker. It really amazes me how clean the paper towel filter will get the wax!

This is a shot with the two different containers out where you can see them. Remember to put an inch or so of water in the lower container so the molten wax will float on it when it drips...